Monday, August 20, 2012

Sunday Morning Goodness: Cherry Chip Muffins with Brown Sugar Streusel

Fresh produce is a terrible thing to waste. I've not always been good about using up the inventory, but more often I'm looking to the fridge and pantry to decide what to make rather than simply going out and buying everything I need. So, with that in mind, this morning I decided to base breakfast around the aging bag of bing cherries in my fridge. After peeking in the backs of cabinets and around the fridge, I realized I had 4 eggs, 2 sticks of butter, some brown sugar, plenty of flour, and a half a bag of white chocolate chips (not the lightest list of ingredients, I'll admit). Cherry Chip muffins it is!

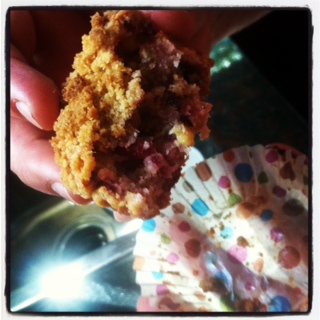
I encountered some difficulties with my first batch of muffins that I successfully avoided with the second. On the first batch, I filled the muffin cups too full, waited to add the streusel, and under cooked them by about 10 minutes. The recipe and directions below reflect the process I followed for the second batch, which turned out fluffy and delicious. Make sure the muffins cool almost entirely before you eat (read: devour) them. The result is a pink, fluffy cupcake with a deliciously sweet top, and surprising bits of cherry and chocolate in every bite. Enjoy!

Ingredients:

Muffins:
2 cups chopped organic bing cherries
2 1/2 cups flour
1 stick butter, melted completely
2 tablespoons baking powder
1 tsp salt
1/2 cup white sugar
2 eggs
1 cup milk
1/2 bag (about 1 cup) white/milk/dark chocolate chips

Streusel:
2/3 cup flour
1/2 cup brown sugar
1/2 stick butter, chilled and chopped into small pieces


Preheat oven to 380. Next, start by removing the pits from your cherries. I removed the pits by cutting the cherry all the way around the pit and twisting until one of the sides of the cherry broke away. Then, I used the tip of a grapefruit spoon to dig the pit out of the center. I know this sounds time-consuming, but it's a pretty quick process. I was able to do 30 cherries in about 15 minutes.

Next, chop up your cherries into the consistency you desire. If you like chunks of fruit in your muffins, cut each cherry into halves or fourths. If you prefer the cherry taste without the chunks, consider dicing them. Just note, the finer the cherries, the heavier the muffin.


Next, in a large bowl combine flour, white sugar, baking powder and salt. Set aside.

In a standing mixer, add eggs and beat vigorously with beater attachment until light and fluffy. Add milk and continue to beat, creating a frothy mixture. Slowly add melted butter a little bit at a time in order to temper the eggs and maintain the consistency of the mix.

Add flour mix to egg mix a bit at a time, mixing constantly with paddle attachment. Once combined, fold in cherries and chocolate chips and stir.


Next, make your streusel by adding brown sugar and flour to a medium-sized bowl. Add in the copped butter and combine the mixture with your hands until you have a crumb-like consistency.

Add muffin batter to tins lined with paper muffin cups (coated with a non-stick spray) until each cup is no more than 2/3 full. Top with streusel until cup is full. Place in oven and bake for 28-30 minutes. Let muffins cool for 30-45 minutes before enjoying. Serve with Noosa yogurt, devonshire cream, or on their own!

Enjoy!


xo, LNH

Saturday, August 18, 2012

Simple Satisfaction: Homemade Margharita Pizza

Homemade pizza is so comforting and delicious, and it can be made in a way that doesn't leave you feeling guilty and over-stuffed! Late August is the perfect time to load up your pizza with colorful, fresh veggies and herbs -- tomatoes are never more flavorful than they are this time of year, and the basil is plentiful and relatively inexpensive. I also love purple potatoes, peppers, zucchini, butternut squash, and asparagus, in whatever combination and quantity you desire. Loading your pizza with items like these adds heartiness and substance without adding unnecessary calories. Regardless of what you decide to put on your pie, cutting back on sauce and cheese deducts very little from the experience, and allows you to indulge in yummy pizza virtually guilt-free.

Below is the recipe for my favorite late-summer concoction: Homemade Margharita Pizza with an olive oil base, topped with tons of fresh tomatoes and basil, a touch of mozzarella, and a balsamic reduction drizzle.

If you're running short on time, you can make the pizza using pre-made dough (Whole Foods sells fresh, ready-to-bake pizza dough in both white and whole wheat). If you want to go all the way, the recipe below is easy and delicious. Either way, have fun and enjoy!


Ingredients:

  • Dough:
  • 3 1/2 to 4 cups all-purpose flour, plus more for rolling 
  • 1 teaspoon sugar
  • 1 envelope instant dry yeast
  • 2 teaspoons kosher salt
  • 1 1/2 cups hot water
  • 2 tablespoons EVOO
Toppings:
3 large, ripe organic tomatoes, sliced thin
15-20 basil leaves, julienned
1/2 cup shredded mozzarella
1/4 cup freshly grated parmesean
EVOO
3/4 cup balsamic vinegar
s&p

Directions for Dough:
Combine the bread flour, sugar, yeast and kosher salt in the bowl of a stand mixer and combine. While the mixer is running, add the water and 2 tablespoons of the oil and beat until the dough forms into a ball. If the dough is sticky, add additional flour, 1 tablespoon at a time, until the dough comes together in a solid ball. If the dough is too dry, add additional water, 1 tablespoon at a time. Scrape the dough onto a lightly floured surface and gently knead into a smooth, firm ball.
Grease a large bowl with the remaining 2 teaspoons olive oil, add the dough, cover the bowl with plastic wrap and put it in a warm area to let it double in size, about 1 hour. Place dough ball on a lightly floured surface and knead/stretch out to create a large circle. 
Heat outdoor grill to a medium heat. Place dough directly on the grill and cook until lightly brown and firm on both sides, but no longer than 5 minutes total (dough does not need to be cooked through, just slightly crisped.  

Directions for Pizza:
Preheat oven to 450. Cover toasted pizza crust with a thin layer of EVOO (about 1-2 tablespoons). Sprinkle with sea salt and freshly cracked pepper. Add a layer of thinly sliced tomatoes. Add a bit more s&p to top of tomatoes.Cover with basil, mozzarella and parm.


Place pizza in oven for 10-15 minutes, or until crust is browned and cheese is thoroughly melted.

While pizza is cooking, add balsamic vinegar to a small sauce pan and place on the stove over high heat. Boil   vinegar for 10-15 minutes, or until it thickens to the desired consistency.


Once pizza is cooked, remove from oven and drizzle with the vinegar reduction. Add a bit more pepper, if you'd like. Enjoy!


Monday, August 13, 2012

Crowd Pleaser: Pappardelle with Spicy Italian Sausage Ragu

I recently spent a weekend at Copper Mountain with my good friend Shanelle K. Shanelle is one of the most talented home-cooks I've ever had the pleasure to befriend. Dinners at her house consist of multiple courses, each one meticulously planned and prepared with the best ingredients and a whole lot of love. Eating at her kitchen table is as good as eating any one of the much-lauded restaurants in town. That's why when Shanelle offered to make dinner for the group in Copper, I knew we were in for a treat.

Very few dishes are as warm and satisfying as a bowl of pasta done right. Pasta, while simple, can so easily be bland or boring. I try to avoid wasting calories on uninteresting food, and thus dont consume pasta unless it's a really special combination of flavors and ingredients. Shanelle's dish, while straight-forward and seemingly common, packs flavor and sophistication that are unparalleled in the world of tomato-based pasta dishes. If your family is anything like mine, you will be a very popular person after serving this! Thanks again to Shanelle K. for crafting such a unique and lovely meal!

Ingredients:

2 packages fresh pappardelle (Pappardelle and Cucina Fresca brands are great -- or feel free to make your own!)
1 lb hot Italian sausage (or turkey sausage)
1 lb mild Italian sausage (or turkey sausage)
1 tblsp red hot pepper flakes
1 tblsp fennel seeds
4 cloves garlic, diced
1 large (28 oz) can diced tomatoes (365 brand is best) (do not drain!)
1 carrot, chopped
1 celery stalk, chopped
1 red onion, chopped
1 fennel bulb, cored and chopped
freshly grated parmesean cheese
pinch of parsley

In large pan, cook up the sausage. Once browned, transfer meat to a large bowl with a slotted spoon, leaving remaining oil in the pan to cook veggies. Set aside. Throw pepper flakes, fennel seed, garlic, onion, carrot, celery, and fennel into the pan. Cook for about ten minutes, or until veggies start to brown and soften. Add tomatoes and stir. Add cooked sausage and stir. Cover and simmer all together for about 30-45 minutes, or until sauce thickens. In the meantime, bring to boil large pot of water. Cook fresh pasta for about 5 minutes. Drain and add ragu sauce to cooked noodles. Top with parsley and grated parm. Enjoy!

Filling, Healthy and Fast: Tri-Color Veggie Salad with Basil-Infused Olive Oil

This recipe, courtesy of my good friend Kelly M., has been a go-to staple in my home this summer. It's so easy (and inexpensive!) to make, tastes light and healthy, and saves for days. So far, I've combined the veggie mix with couscous, quinoa, and fusilli pasta. The veggie mix is great on its own, but adding a grain like quinoa or couscous doubles the volume without adding much additional effort or expense. Enjoy this recipe as a side dish to grilled chicken or fish, or like me, use this as the main (or only) dish -- you'll be surprised at how completely satisfying this simple meal truly is!

Ingredients:

1 bag frozen edamame
1 can corn
1 pint organic grape tomatoes, each tomato cut in half
1 red onion, chopped
2 handfuls basil
EVOO
s&p
1 cup quinoa or couscous (uncooked, for 2 cups cooked)
balsamic vinegar, if desired


 On stove-top, prepare couscous/quinoa/pasta as directed. Set aside.

Peel and chop red onion. Place in large pan with 2 tsps EVOO on stove at medium heat. Cook for 3-5 minutes, or until onion softens and begins to lightly brown. Add frozen edamame. Cook for 2-3 minutes. Add corn and tomatoes. Add s&p to taste. Leave on stove and allow to cook until veggies are at desired consistency.


As veggies are cooking, add basil, s&p and 1/3 cup EVOO to small food processor. Blend together until smooth. Pour over veggies and stir. Add in quinoa/couscous/pasta. Top with balsamic vinegar, if desired. You can also add a cheese, like a parm or feta. The substitutes and potential add-ins are endless!


Voila! That's it. This meal from start to finish takes less than 20 minutes. Total cost is about $17 (using organic basil, tomatoes, onion, and corn). Its totally easy and so so tasty. The best part is scooping up all of the left-overs into Tupperware containers and taking it to work the next day for lunch!


Thanks to the lovely Kelly M. for this deliciously simple tidbit.

xo, LNH

Sunday, August 12, 2012

It Begins with Breakfast...

There is nothing quite like a cool, late-summer Sunday morning in Denver. I look forward to days like this all season long. I like to wake up early, get outside, and enjoy the hint of fall that's in the air. This morning had "the perfect morning," and therefore "the perfect brunch," written all over it. The only question remaining was, could I finally make the perfect scone?

I've been trying out variations of different scone recipes all summer long. Most of them have been OK, but far from spectacular. The best scone I've ever had was from a hole-in-the-wall bakery called Martine's near 9th and Lincoln in Denver. Big, perfectly-shaped, moist scones in as many flavors as you could ever imagine. Having come across this bastion of pastry goodness one day on my way to work, I was blown-away by the Raspberry and Orange Scone with Vanilla Bean Glaze. Ever since that fateful day my misson has been to replicate (or dare I say surpass) the deliciousness embodied by Martine's maginificant berry scones.

My prior scone failures all had one thing in common -- I added one (or six) ingredients too many. I made things more complicated than necessary. So, today I decided to "KISS" ( = keep it simple, stupid!). If I've learned one thing from my culinary adventures to date, its that the simplest recipe combined with the freshest ingredients usually yields the tastiest result. Intent on finally making a Grade A scone, I decided to make a very basic buttermilk varietal and add orange zest and fresh, whole organic raspberries (in season and delicious through the end of August!). The result, while perhaps not quite perfect in size and shape, was every bit as yummy as that delicacy from the hole-in-the-wall many months ago.

Ingredients:

1 1/2 sticks chilled unsalted butter
1 tsp sea salt
1/2 cup sugar
3 cups all-purpose flour
1 cup cold buttermilk
2 1/2 tsp baking powder
1/2 tsp baking soda
1 large orange (from which to make a tablespoon or + of zest)
1 pint organic raspberries

Preheat oven to 400. In a standing mixer fitted with a paddle attachment, or in a large bowl, combine dry ingrediants. Add butter by slicing it into the dry mix about 1/2 inch at a time. With your hands, combine the dry mix and butter until you have a soft crumble. Add orange zest and mix. Add buttermilk slowly, folding the dough into itself with a fork or spatula until ingrediants are fully combined. Carefully add raspberries and fold into dough.


The more raspberries, the merrier! Place dough on lightly-floured surface and knead through 3-4 times. If your dough is hard enough, form a round ball about 1" thick and cut into pie slices. If your dough is too moist, like mine was, just spoon heaping piles onto a baking sheet lined with parchment paper. It will taste delicious either way!


If you want firmer dough than what I created, try using about 3/4 cup buttermilk. I chose not to lessen the amount of milk this time, but I will try it next time and see if that clears up the problem (without sacrificing moistness and flavor).

Bake at 425 for about 20-25 minutes. Mine took the full 25, and the bottoms were just brown enough without being or tasting burned. I made rather large scones (6 to a baking sheet), and I got 12 out of this recipe.  My husband (Alex) and I ate ours warm with lemon curd and, of course, more butter. Yum!


PART II:

What man can survive brunch on scones alone? Not my husband, that's for sure. He requires things like sausage, potatoes, and eggs. I don't cook with (or eat) much meat, but I am also far from vegan. So, eggs it was. To accompany our delicious little (BIG) scones, I made a simple frittata with sun-dried tomatoes, spinach and asiago cheese. I made the mistake of adding green onions in addition to a shallot. Low and behold, onion was the dominant flavor. I will therefore leave the green onion out of the recipe provided below:

Ingredients

4 eggs
4 egg whites
1/2 cup freshly grated asiago
1 shallot, finely chopped
2 cups fresh spinach
10 sun-dried tomato halves (cut julienne-style)
handful of basil leaves (cut julienne-style)
EVOO (extra virgin olive oil)
s&p

Preheat oven to 425. On stove-top over medium heat, cook shallot in EVOO for 2-3 minutes, or until soft and lightly browned. Add spinach and more EVOO (you dont need more than 2-3 tsps of oil, total). Cook spinach with shallot for about 3 minutes. Remove from heat.

In mixing bowl, combine eggs, s&p, asiago, basil and tomatoes. Add in spinach and shallot mixture and combine (be careful that spinach is not too hot when added to eggs -- if necessary, temper the eggs by adding a small amount of the spinach mix at a time, stirring as you combine). Pour into pie dish or 10" cast-iron skillet.


Place in oven and bake for about 15-18 minutes. I baked mine for about 13-14 minutes and cut into a runny center, so be sure that the center is firm/cooked through before serving.

Very simple. Very fast. Very yummy. Enjoy!

Welcome to The Nourishing Nook

"This is my advice to people: Learn how to cook, try new recipes, learn from your mistakes, be fearless, and above all have fun." -- Julia Child

I love to cook. I get more satisfaction from a failure in the kitchen than I do from a success in the office. If consuming good food nourishes the body, then creating that good food with your own two hands nourishes the soul. For me, there is no better way to say "I care" than to provide a loved-one with a delicious home-cooked meal. Similarly, there is no better way to appreciate the fruits of the Earth than to prepare meals with fresh, seasonal, local produce. To me, food is love!

The purpose of this blog is two-fold: first, I aim to document my culinary endeavors, both successes and failures, for future use and preservation; second, I hope to share many of the wonderful recipes passed on by other home-cooks who, like me, are beguiled by the type of nourishment a home-cooked meal provides -- satisfaction for the body and soul.

Thank you for taking the time to read my blog. A meal, whether posted online or served at the table, is best shared with others.

xo, LNH